When applying for certain documents, such as passports, ID cards, or driver’s licenses in your country, you must prepare the required photos to prove your identity. According to the Brazilian government, you must show a 3×4 cm photo when applying for a Brazilian driver’s license, national identification, SPTrans Bilhete Unico, and employment record book. If you do not follow the rules, you are not allowed to go through the application and obtain the card successfully. Therefore, you need to have a compliant photo. In this article, we will show you detailed guidelines on how to make and print a 3×4 photo online for free.
What Is the Size and Requirements of the 3×4 Photo?
The 3×4 photo size is a standard dimension often used for ID cards, passports, and other official documents in various countries. Measuring 3 cm by 4 cm, this photo size ensures that your image fits neatly within the specifications required by many institutions. In this section, we’ll cover the exact dimensions, requirements, what to wear, etc.
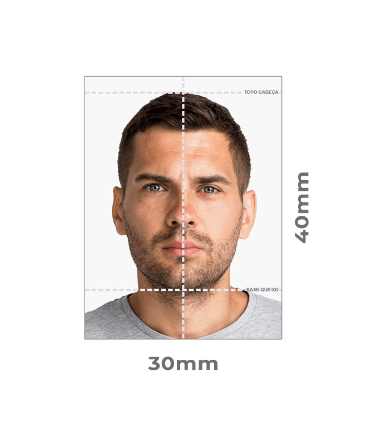
Below are different sizes of 3×4 photos:
| Photo Szie in cm | 3 x 4 cm |
| Photo Size in mm | 30 x 40 mm |
| Photo Size in inch | 1.18 x 1.57″ inches |
| Photo Size in pixel | 709 x 945 pixels, at DPI 600 resolution 354 x 472 pixels at DPI 300 resolution |
Attire, clothing, and hair
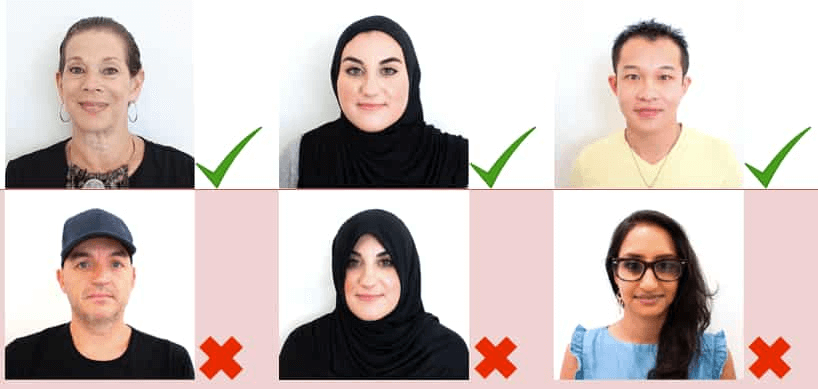
- When taking a photo, it is recommended to wear everyday clothing, such as a plain, solid color background without large patterns or prints. Therefore, you should avoid uniforms, costumes, or clothing that looks like a disguise.
- It is up to you to keep your hair up or down if it doesn’t cover your face. In addition, for men, it is allowed to keep a beard or other facial hair if it does not prevent identification, but you should keep the same facial hair roughly when you travel on board.
Earrings, glasses, and other accessories
- Choose some studs or small hoops because they won’t cover your face or reflect in your photo. Avoid large, shiny earrings.
- If you wear glasses daily, you should wear them in your 3×4 photo. However, you must make sure that there is no glare or reflection on the lenses. If your glasses don’t have an anti-reflective coating or the frames may cover any part of your eyes or eyebrows, it’s best to take them off.
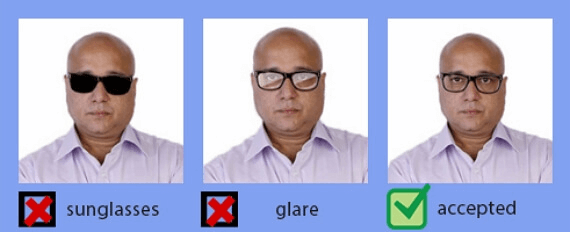
- If you need to wear dark glasses in the picture because of a medical condition, you must show a statement from your doctor.
- If you need to wear a head covering for religious reasons, you can wear it in your visa photo as long as your face can be fully displayed. In addition, if you wear headscarves and hats for medical reasons, you will be asked to show an official statement from your doctor.
- Natural, everyday makeup is permitted in visa photos. But don’t overdo makeup. It will be ok if you just wear a light foundation or concealer, a little mascara, and a touch of lip color.
Background, shadows, and distance
- You must find a plain white or off-white background for your photo. You can’t use any patterned or colored backdrops.
- In addition, there is enough and even light in the background with natural sunlight. If not, you must use the lamp to make up for the light. And it’s not allowed to cast shadows on your face or background.
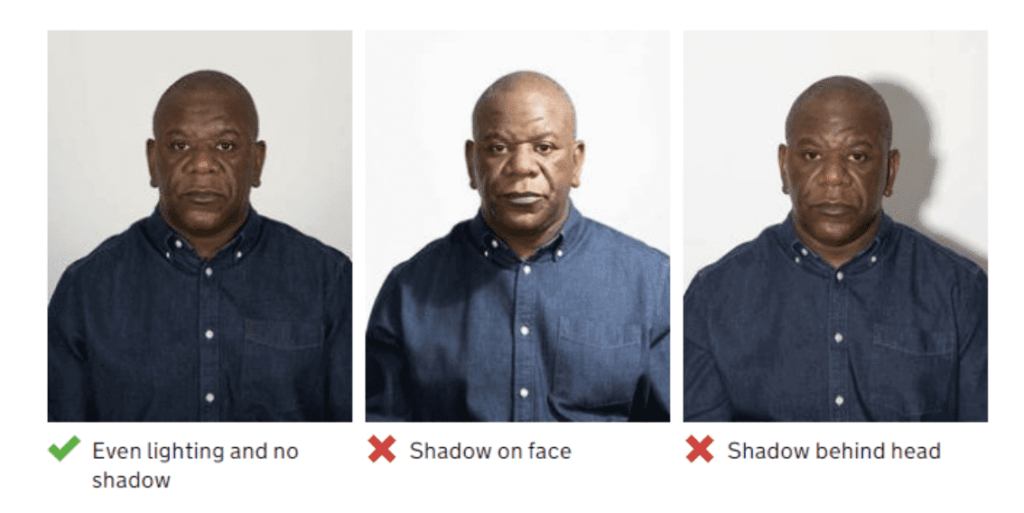
- Putting your phone or camera in front of the background, about 1.5 meters, will be a good choice. This way you can center your head in the frame and take up 50-69% of the image. Of course, you must set the height of the camera well too and it should keep at the same height as the applicant’s eyes.
- Keep in mind that there should only be you in the photo, which means no friends, family or other objects in the photo.
Expression and facial features
- Keep a natural facial expression when you take a photo. It is allowed to smile in a photo, but it must be a natural and gentle smile, rather than a toothy and big grin. However, it is better to keep calm and natural expressions, if a smile doesn’t come naturally to you.
- When you take a photo, you must stand or sit straight and look at the camera directly, not tilt your head or shoulders.
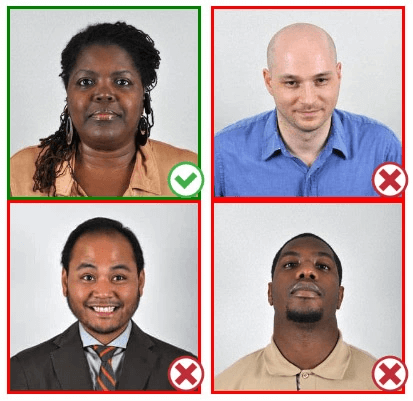
- Keep your body still while taking a photo, otherwise you will get a blurry photo because you are moving your body. You must make the photo clear and focused, without blur or distortion.
- In addition, your eyes should be open and visible in the photo, without hair or other objects obstructing them. Red-eye is not allowed in a photo, so it’s not recommended to use the camera flash. This is because can reflect off the back of your retina, which creates a red reflection in your eyes.
Since you have followed the above instructions, you can easily take a photo at home. Get as many photos then you can pick the one you’re happy with.
How to Make a 3×4 Photo for Free: 4 Methods
After you have taken a photo of your Brazilian ID card, it must be turned into a required and default size. The acceptable Brazil ID card photo size is 3×4 cm, with a resolution of 600 x 600 pixels. Moreover, if you apply it online, the digital photo should not exceed 240 kilobytes. To get a high-quality and acceptable 3×4 cm photo, there are many passport photo editors available to crop it, such as AiPassportPhotos, Canvas, and Microsoft Word. Let’s have a quick look at the methods to make a 3×4 cm photo on your own.
| Feature | 🔥AiPassportPhotos | Canva | Microsoft Word | iPhone |
| Ease of Use | Very easy, automated process | User-friendly interface | Fairly straightforward | Convenient on-the-go option |
| Technology Used | AI-powered image processing | Web-based image editor | Basic photo editing in Word | iPhone default photo editor |
| Background Handling | Automatically changes background | Manual changing | Manual changing | Manual changing |
| Accepted in ID Apps | Yes | Not 100% | Not 100% | Not 100% |
| Platform | Online | Web-based | Desktop | iPhone |
| Printing Template | Yes | No | No | No |
How to Make a 3×4 Photo with Online Passport Photo Editor
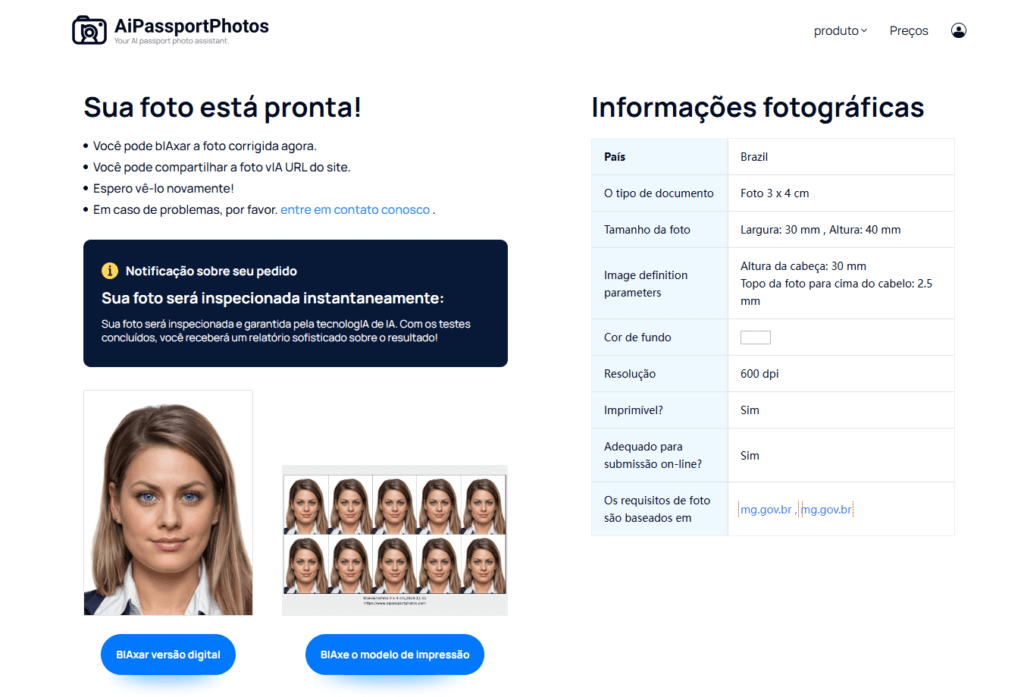
AiPassportPhotos is a professional and intelligent online passport photo editor, which can help you make a 3×4 cm photo with just a few steps. With AI technology, it can automatically create a perfect and compliant photo, without any complicated manual operations. Here you can follow the steps below and have your photo done easily.
- Launch the AiPassportPhotos online passport photo editor on your device.
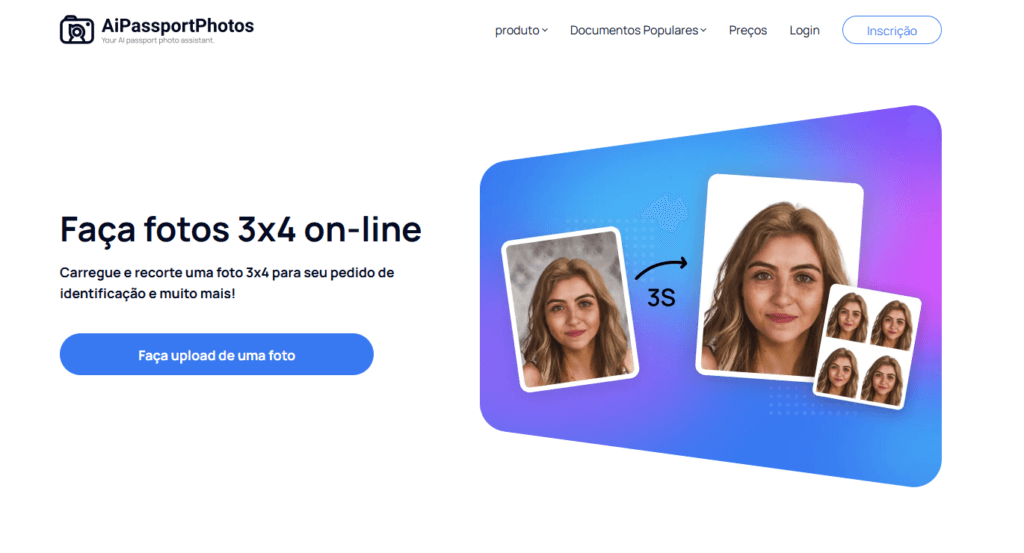
- Upload a photo that you want to crop it to 3×4 cm.
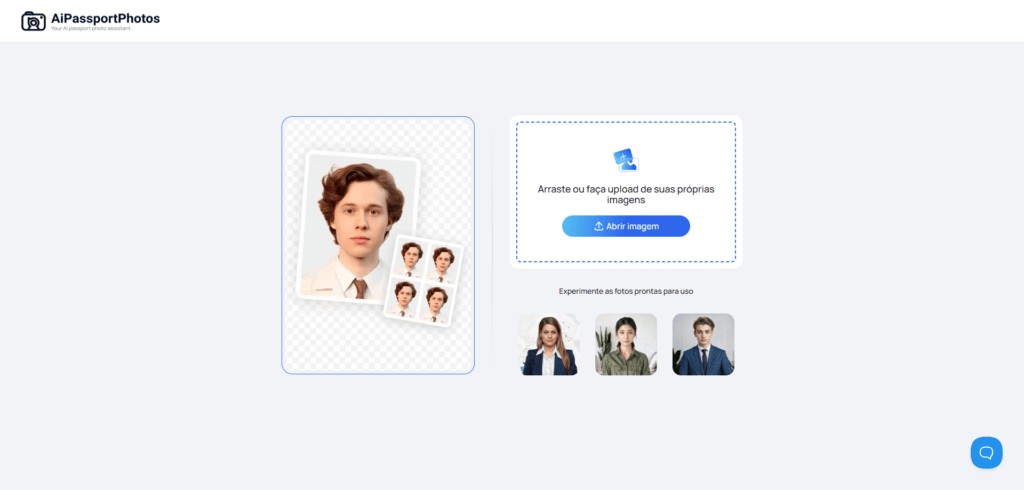
- Wait for AI technology to process your photo. It’ll take a few seconds. During this procedure, it will crop your photo size correctly and quickly, and change your background to the correct one.
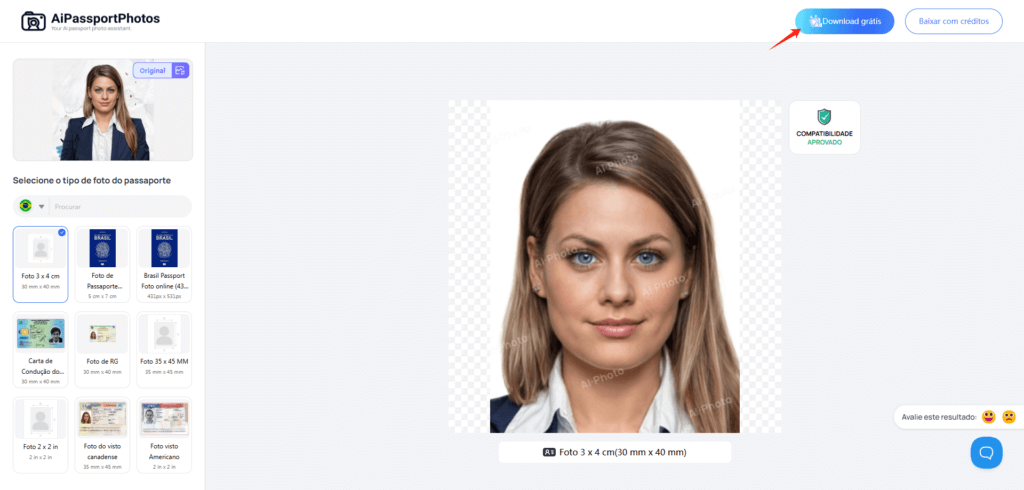
- Once done, you can preview the qualified 3×4 photo online. Then click “Free Download” on the top right corner to download the 3×4 photos on your device for free.
- That’s it, you can get a compliant 3×4 cm photo and it is accepted in the official ID application.
How to Make a 3×4 Photo on Canva
As we all know, Canva usually offers a handy image editor that allows you to resize images with ease. Here we will show you how to resize images in Canva on PC with simple steps:
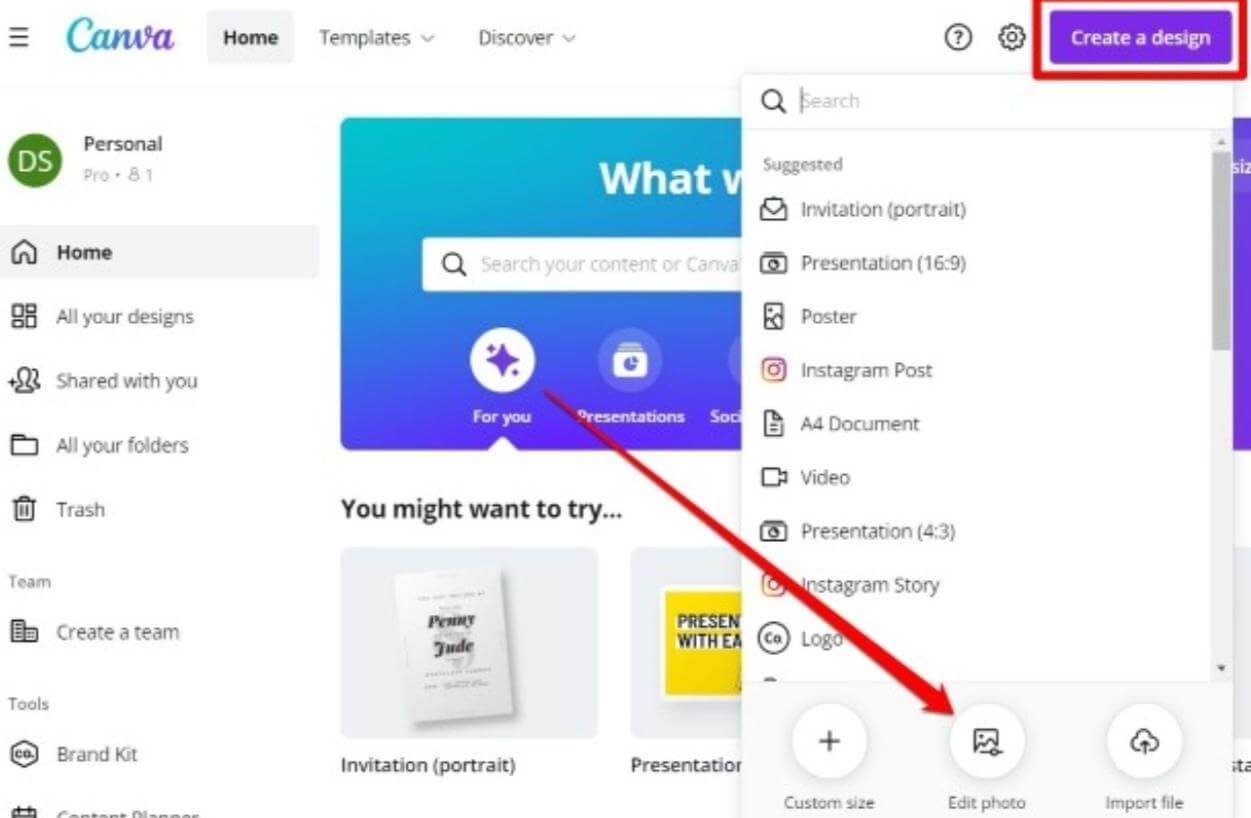
- Navigate to Canvas on your preferred web browser.
- Click “Create a design” and choose the “Edit photo” from the menu.
- Upload a photo from your device and select “Edit Photo” > “Resize” at the top.
- Select the unit you prefer in inches, centimeters and millimeters and enter your preferred sizes in the width and height field under Customization.
- Once done, you will get a perfect size photo.
- Or you can choose various presets to recrop your photo into the perfect dimensions by selecting a size option and clicking on “Resize” to apply the size to your image.
How to Make a 3×4 Photo in Microsoft Word
Another useful way for you to make a 3×4 photo is Microsoft Word. Yes, you can use the photo function to crop your photo easily in Word. Here you can follow the steps below and get your photo done.
- Create a new Word document on your device.
- Upload a photo by clicking on the “Insert a picture” function.
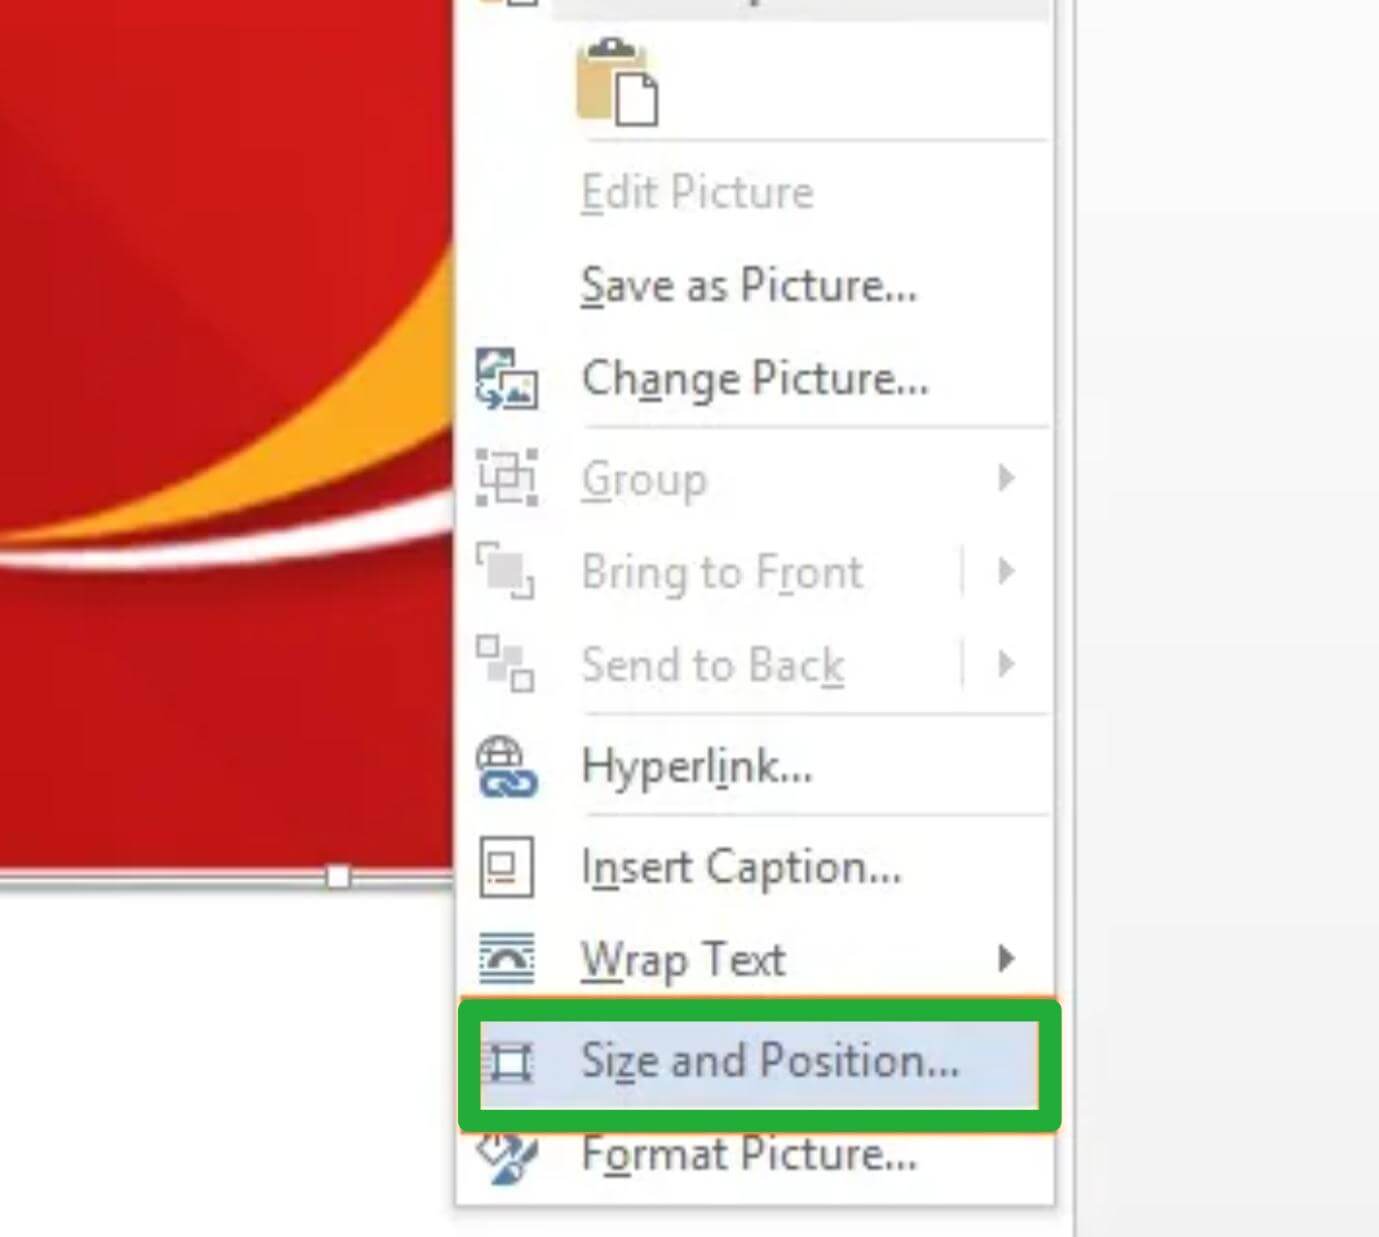
- Right-click the image and select “Size and Position” > “Size” in the pop-down box.
- Choose the paraments with centimeters, millimeters or pixels, then enter the needed values for the height and width of the images.
- Once finished, you can click “OK” to have your photo resized and save it on your device.
How to Make a 3×4 Photo on an iPhone
If you are out of the office without a computer but need a quick 3×4 cm photo, you can use your iPhone’s default recropping feature. Here are the instructions for creating a 3×4 photo on your iPhone.
- Open your photo library and select the picture you want to change size.
- Select the “Edit” option in the upper right-hand corner.
- Click the third icon “crop” at the bottom right of the screen.
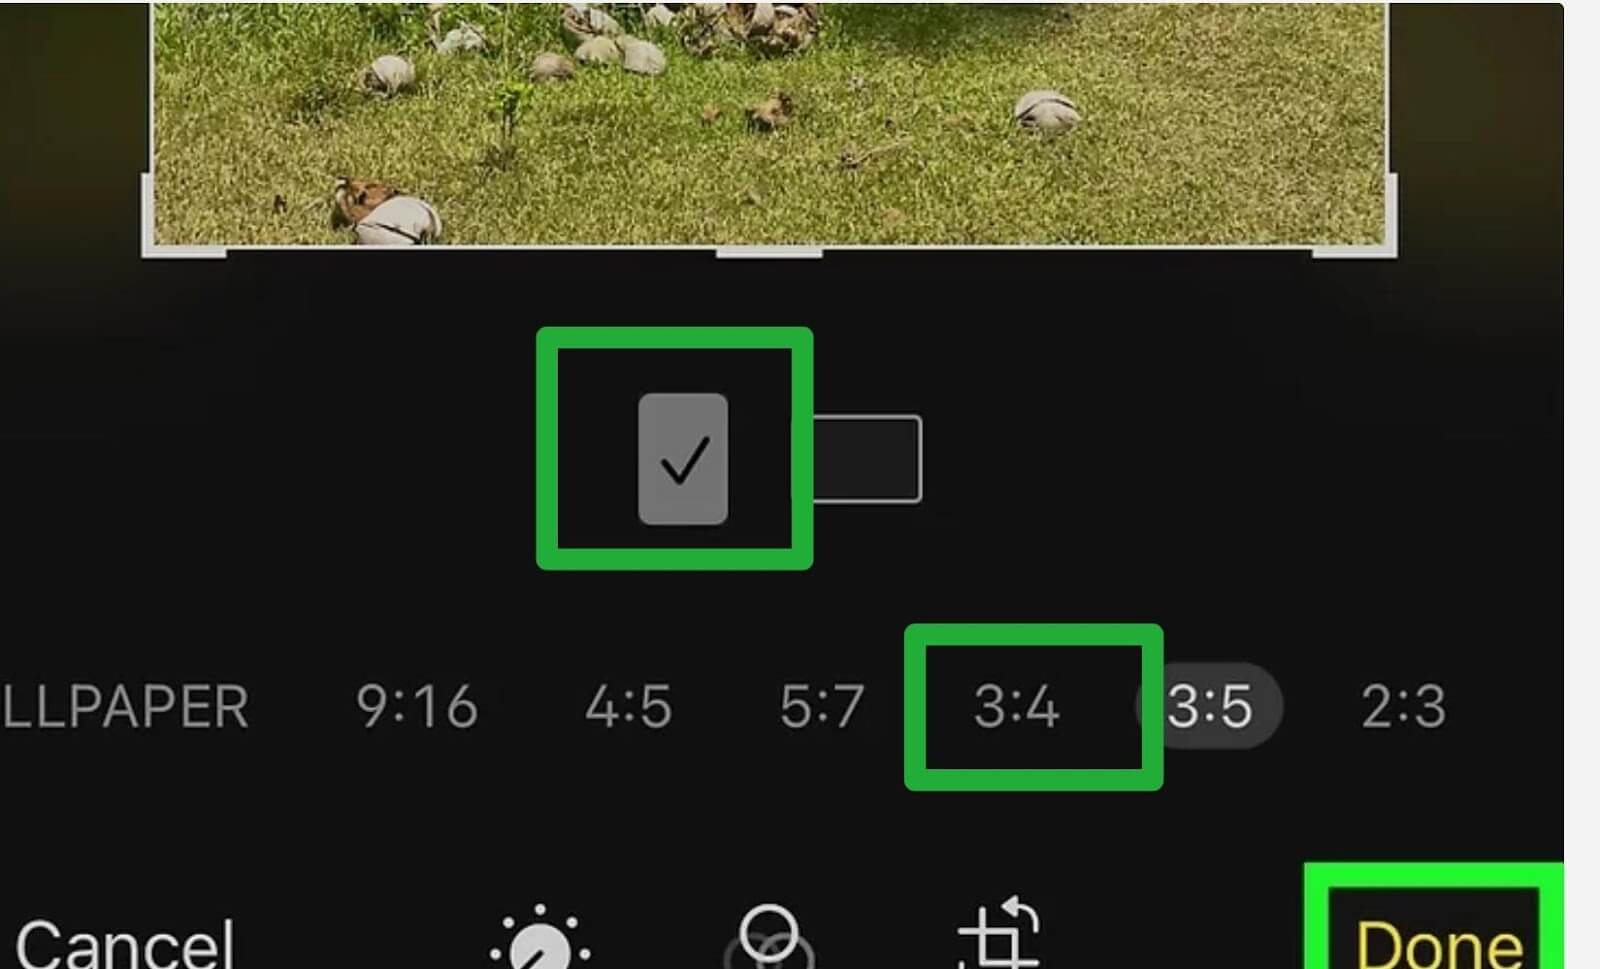
- Tap the aspect ratio icon that looks like a series of boxes in the upper right corner.
- Select a 3:4 ratio and hold the first frame clicked. Then it will automatically take a 3×4 photo.
- Click “Done” in the upper right corner and save your photo on your device.
In addition, there are some other professional photo editing apps, such as Image Size to make a great 3×4 photo.
- Download and open Image Size on your device.
- Upload a photo that you want to change size by clicking the icon in the upper left-hand corner.
- Select the unit of measurement, such as pixel, mm, cm, and inch, and enter the number in the white boxes. You need to click the link icon between these boxes to make sure the aspect ratio of your picture stays correct.
- Once completed, tap the “Done” button and save it on your device.
How to Print 3×4 Photos on a Printer
When you have made a correct 3×4 photo, the next important step is to print it on your device. Here you can follow the steps below on how to print images from Google.
- Download and open the Google Photos app on your phone.
- Select a photo you want to order prints from and select the cart icon from the three-dot menu icon in the upper right corner.
- Tap print and preview your photo if you want to make any changes. Then click “Next” to select a store to pick up from.
- Here you can choose to print at stores with a glossy finish or a matte finish.
- Select “Select Location” to check store hours and select your printed photos.
Make sure you prepare two high-quality printed photos. No blurred photos are acceptable in your visa application.
What Can I Do with 3×4 cm Photos?
Once you have obtained 3×4 cm photos, you can use them when you want to apply for a Brazil identity card, Brazil driver’s license, SPTrans Bilhete Unico, and employment record book in Brazil. So, it’s still useful to keep several 3×4 cm photos at home for any usage.
Additional Tips on How to Resize the Image without Losing Quality
When you resize the photo, it will easily lose quality due to the change in resolution. In your visa application, you must show a clear and high-quality printed or digital photo, otherwise, your application will be rejected. So you need to take some steps to prevent it. Here we go.
When you take a photo
When you take a photo, you can use a tripod to take a steady photo to avoid the vibration of the lens, reducing the blur of the photo. It is also recommended to have a high-quality camera to get an HD photo.
Use a Photo Enhancer
After you take a look at your photo, it looks a bit blurry. But you don’t know which step is wrong. Here you can use the Photo Enhancer in AiPassportPhotos photo tool to repair blurry photos. Here you can see the steps below:

- Open the Photo Enhancer on your device.
- Upload the photo you want to improve the photo quality on the Photo Enhancer.
- Wait for AI technology to automatically process your photo. It will take about a few seconds, so be patient.
- Once done, you can save it on your device.
Conclusions
To conclude, you need to know some photo requirements before you take a photo at home by yourself. In addition, although you can use Photo Enhancer to improve your photo, it is not allowed to beautify your photo too much or add some filters to it. I hope you get your Brazil visa application quickly with the correct photos.